

代码拉取完成,页面将自动刷新
随着图像分类和目标检测技术的蓬勃发展,它们与物联网的综合应用在各个领域展现出广泛的潜在应用价值。本项目基于ESP32-CAM下位机和Python上位机,旨在创造一个多领域应用的低成本通用图像分类/目标检测物联网平台。

PlatformIO\Projects\esp32cam-test\src\esp32cam-test.cpp中配置WIFI_SSID和WIFI密码esp32cam-pytorch-thread-mjpeg_yolo.py或esp32cam-pytorch-thread-jpg_yolo.py
| 键值 | 任务类型 | 任务 | 模型架构 |
|---|---|---|---|
| g | 图像分类 | 垃圾分类 | ConvNeXt |
| d | 图像分类 | 日常用品 | ViT |
| r | 图像分类 | 万物识别 | ResNeSt |
| o | 目标检测 | 通用目标检测 | DAMO-YOLO |
| h | 目标检测 | 人头检测 | DAMO-YOLO |
| f | 目标检测 | 口罩检测 | DAMO-YOLO |
| p | 目标检测 | 手机检测 | DAMO-YOLO |
q退出程序垃圾分类
 |
 |
|---|
日常用品
 |
 |
|---|
万物识别
 |
 |
|---|
| 通用目标检测 | 手机检测 |
|---|---|
 |
 |
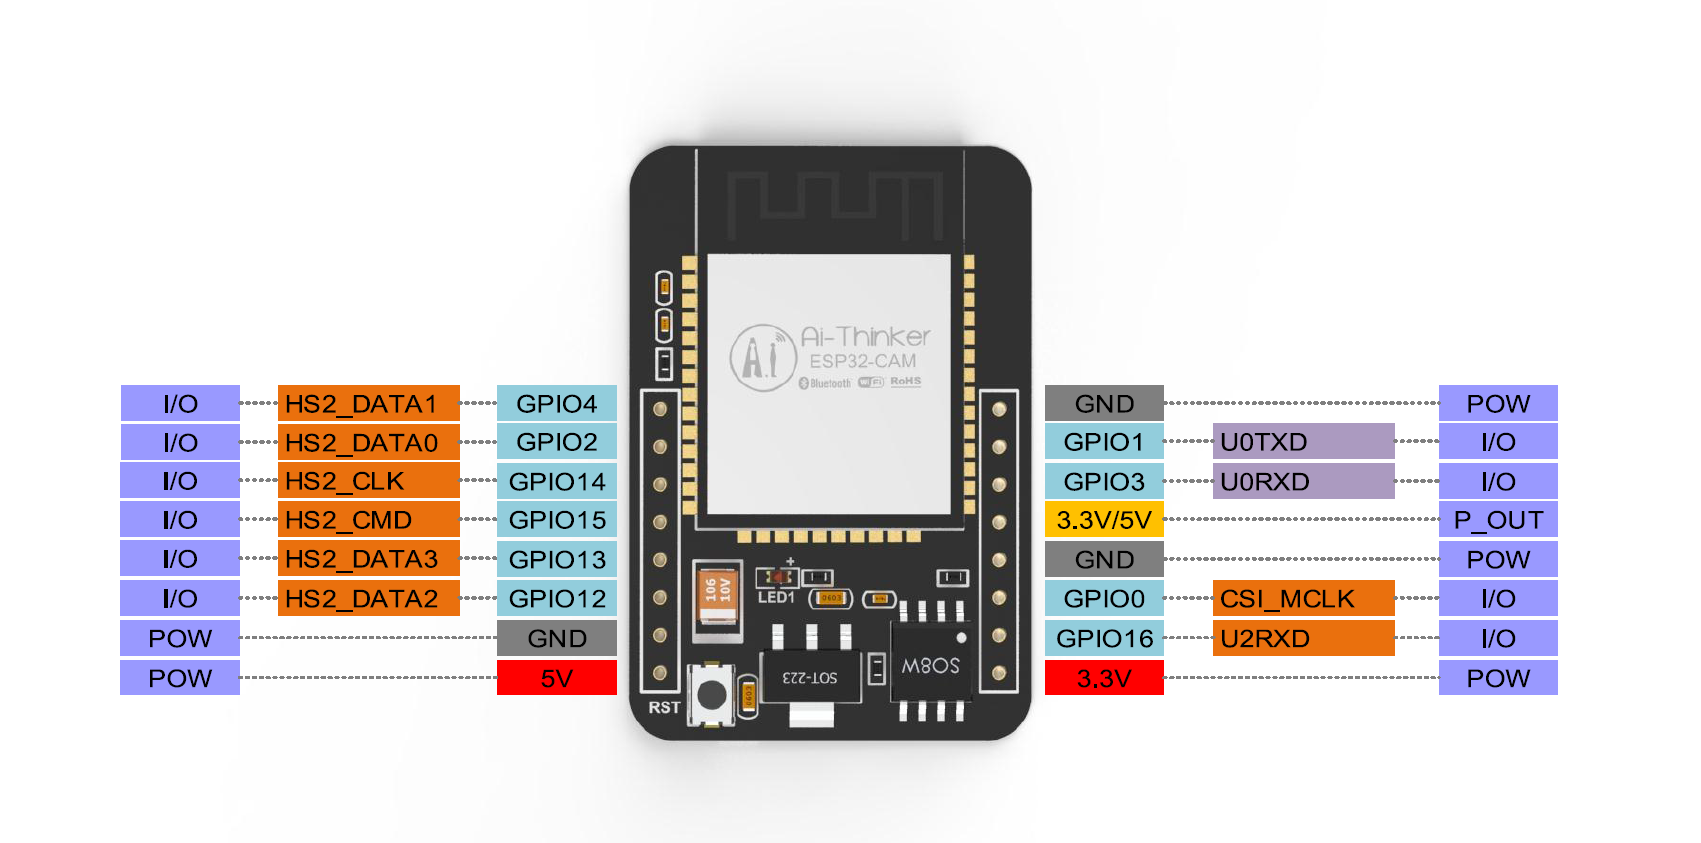
ESP32-CAM是安信可最新发布小尺寸的摄像头模组。该模块可以作为最小系统独立工作,尺寸仅为2740.54.5mm,深度睡眠电流最低达到6mA。
ESP32-CAM可广泛应用于各种物联网场合,适用于家庭智能设备、工业无线控制、无线监控、QR无线识别,无线定位系统信号以及其它物联网应用,是物联网应用的理想解决方案。
ESP32-CAM采用DIP封装,直接插上底板即可使用,实现产品的快速生产,为客户提供高可靠性的连接方式,方便应用于各种物联网硬件终端场合。
ESP32-CAM的一种常见部署方式是作为局域网的Web Server。连接在同一网段的下位机或其他物联网设备可以通过访问ESP32-CAM的IP地址来获取ESP32-CAM捕获到的图片或视频。在这种情况下,网间进程的工作模式是两层的Client-Server模式,应用层协议为HTTP,传输层协议为TCP。
ESP32-CAM Web Server 和它的 Client (以上位机的python程序为例)的一种可能的数据传输过程如下:

结合网络信息系统基础的万维网技术架构有关知识,该示例中python上位机的工作流程如下图所示:

为了在VSCode开发环境中构建和调试ESP32-CAM工程,以及获得更快的编译速度(不用像Arduino那样每次下载都重新编译),本项目使用PlatformIO作为开发环境。首先,在VSCode中下载PlatformIO插件,并重启VSCode以安装PlatformIO IDE。

PlatformIO的在线框架对国内用户不太友好,因此本项目从阿里云盘上下载打包好的PlatformIO ESP32离线框架,并添加到PlatformIO的默认库文件路径C:\Users\your_user_name\.platformio\packages\中。
阿里云盘:https://www.aliyundrive.com/s/pFDFnmdz8mi CSDN下载:PlatformIO 离线安装资源
VSCode左下角PIO Home主页新建工程,选择AI Thinker ESP32-CAM作为板子。第一次新建工程可能需要等一段时间,如果太久没反应,说明之前的开发环境配置可能有问题。

在 PlatformIO ESP32 库文件目录C:\Users\your_user_name\.platformio\packages\framework-arduinoespressif32\libraries\路径下,把 yoursunny 的 esp32cam库用 Git Bash 克隆到本地:
git clone https://gitcode.com/mirrors/yoursunny/esp32cam.git
PlatformIO的默认波特率为9600,而ESP32-S芯片的默认波特率为115200。修改工程的配置文件platformio.ini如下:
[env:esp32cam]
platform = espressif32
board = esp32cam
framework = arduino
upload_port = COM8      ;下载程序端口号
upload_speed = 115200   ;下载波特率
monitor_port = COM8     ;串口控制台端口号
monitor_speed = 115200  ;串口控制台波特率
复制esp32cam-test.cpp中的代码到PlatformIO工程中的/src文件夹并编译烧录。
烧录成功并上电复位后串口监视器接收到的值:
CAMERA OK
http://192.168.216.148
  /cam.bmp
  /cam-lo.jpg
  /cam-hi.jpg
  /cam.mjpeg
其中,http://192.168.216.148代表ESP32-CAM的HTTP Web Server的IP地址。将上位机连接到同一网段下,就可以作为Web Client访问ESP32-CAM捕获到的图片或视频流。
在浏览器上访问http://192.168.216.148/cam-hi.jpg进行测试,结果如下:

CAPTURE OK 800x600 15089b
| "No." | "Time" | "Source" | "Destination" | "Protocol" | "Length" | "Info" |
|---|---|---|---|---|---|---|
| "31" | "3.368120" | "192.168.216.13" | "192.168.216.148" | "TCP" | "66" | "60673 > 80 [SYN] Seq=0 Win=64240 Len=0 MSS=1460 WS=256 SACK_PERM" |
| "32" | "3.368294" | "192.168.216.13" | "192.168.216.148" | "TCP" | "66" | "60674 > 80 [SYN] Seq=0 Win=64240 Len=0 MSS=1460 WS=256 SACK_PERM" |
| "33" | "3.539742" | "192.168.216.148" | "192.168.216.13" | "TCP" | "58" | "80 > 60673 [SYN, ACK] Seq=0 Ack=1 Win=5744 Len=0 MSS=1436" |
| "34" | "3.539742" | "192.168.216.148" | "192.168.216.13" | "TCP" | "58" | "80 > 60674 [SYN, ACK] Seq=0 Ack=1 Win=5744 Len=0 MSS=1436" |
| "35" | "3.539870" | "192.168.216.13" | "192.168.216.148" | "TCP" | "54" | "60673 > 80 [ACK] Seq=1 Ack=1 Win=64240 Len=0" |
| "36" | "3.539934" | "192.168.216.13" | "192.168.216.148" | "TCP" | "54" | "60674 > 80 [ACK] Seq=1 Ack=1 Win=64240 Len=0" |
| "37" | "3.540280" | "192.168.216.13" | "192.168.216.148" | "HTTP" | "523" | "GET /cam-hi.jpg HTTP/1.1 " |
| "38" | "3.562168" | "192.168.216.148" | "192.168.216.13" | "TCP" | "141" | "80 > 60673 [PSH, ACK] Seq=1 Ack=470 Win=5275 Len=87 [TCP segment of a reassembled PDU]" |
| "39" | "3.562827" | "192.168.216.148" | "192.168.216.13" | "TCP" | "1490" | "80 > 60673 [ACK] Seq=88 Ack=470 Win=5275 Len=1436 [TCP segment of a reassembled PDU]" |
| "40" | "3.562853" | "192.168.216.13" | "192.168.216.148" | "TCP" | "54" | "60673 > 80 [ACK] Seq=470 Ack=1524 Win=64620 Len=0" |
| "41" | "3.567484" | "192.168.216.148" | "192.168.216.13" | "TCP" | "1490" | "80 > 60673 [ACK] Seq=1524 Ack=470 Win=5275 Len=1436 [TCP segment of a reassembled PDU]" |
| "42" | "3.576185" | "192.168.216.148" | "192.168.216.13" | "TCP" | "1490" | "80 > 60673 [ACK] Seq=2960 Ack=470 Win=5275 Len=1436 [TCP segment of a reassembled PDU]" |
| "43" | "3.576243" | "192.168.216.13" | "192.168.216.148" | "TCP" | "54" | "60673 > 80 [ACK] Seq=470 Ack=4396 Win=64620 Len=0" |
| "44" | "3.579808" | "192.168.216.148" | "192.168.216.13" | "TCP" | "1403" | "80 > 60673 [PSH, ACK] Seq=4396 Ack=470 Win=5275 Len=1349 [TCP segment of a reassembled PDU]" |
| "45" | "3.590868" | "192.168.216.148" | "192.168.216.13" | "TCP" | "1490" | "80 > 60673 [ACK] Seq=5745 Ack=470 Win=5275 Len=1436 [TCP segment of a reassembled PDU]" |
| "46" | "3.590929" | "192.168.216.13" | "192.168.216.148" | "TCP" | "54" | "60673 > 80 [ACK] Seq=470 Ack=7181 Win=64620 Len=0" |
| "47" | "3.595111" | "192.168.216.148" | "192.168.216.13" | "TCP" | "1490" | "80 > 60673 [ACK] Seq=7181 Ack=470 Win=5275 Len=1436 [TCP segment of a reassembled PDU]" |
| "48" | "3.595111" | "192.168.216.148" | "192.168.216.13" | "TCP" | "1490" | "80 > 60673 [ACK] Seq=8617 Ack=470 Win=5275 Len=1436 [TCP segment of a reassembled PDU]" |
| "49" | "3.595111" | "192.168.216.148" | "192.168.216.13" | "TCP" | "141" | "80 > 60673 [PSH, ACK] Seq=10053 Ack=470 Win=5275 Len=87 [TCP segment of a reassembled PDU]" |
| "50" | "3.595191" | "192.168.216.13" | "192.168.216.148" | "TCP" | "54" | "60673 > 80 [ACK] Seq=470 Ack=10140 Win=64620 Len=0" |
| "51" | "3.607203" | "192.168.216.148" | "192.168.216.13" | "TCP" | "1490" | "80 > 60673 [ACK] Seq=10140 Ack=470 Win=5275 Len=1436 [TCP segment of a reassembled PDU]" |
| "52" | "3.607254" | "192.168.216.13" | "192.168.216.148" | "TCP" | "54" | "60673 > 80 [ACK] Seq=470 Ack=11576 Win=64620 Len=0" |
| "53" | "3.612163" | "192.168.216.148" | "192.168.216.13" | "TCP" | "2926" | "80 > 60673 [ACK] Seq=11576 Ack=470 Win=5275 Len=2872 [TCP segment of a reassembled PDU]" |
| "54" | "3.612163" | "192.168.216.148" | "192.168.216.13" | "HTTP" | "783" | "HTTP/1.1 200 OK (JPEG JFIF image)" |
| "55" | "3.612163" | "192.168.216.148" | "192.168.216.13" | "TCP" | "54" | "80 > 60673 [FIN, ACK] Seq=15177 Ack=470 Win=5275 Len=0" |
| "56" | "3.612277" | "192.168.216.13" | "192.168.216.148" | "TCP" | "54" | "60673 > 80 [ACK] Seq=470 Ack=15178 Win=64620 Len=0" |
| "57" | "3.612606" | "192.168.216.13" | "192.168.216.148" | "TCP" | "54" | "60673 > 80 [FIN, ACK] Seq=470 Ack=15178 Win=64620 Len=0" |
| "58" | "3.623687" | "192.168.216.148" | "192.168.216.13" | "TCP" | "54" | "80 > 60673 [ACK] Seq=15178 Ack=471 Win=5274 Len=0" |
为了避免神经网络线程、网络通信线程和opencv处理及显示线程之间的互相阻塞,在上位机的python程序中引入了多线程技术,有效提高了代码执行效率。
使用global标识符定义变量,可以实现多线程之间共享全局变量。
在为了实现各个线程的正常退出而设计的机制中,我们引入了键盘监听的概念。通过调用 keyboard.wait() 方法,主线程在此阻塞等待用户的键盘输入。一旦用户按下 'q' 键,exit_flag 标志位被设置为 True。这一标志的变更起到通知子线程退出当前循环迭代的作用,从而引导子线程在适当的时机正常释放资源并顺利终止。这一设计巧妙地确保了在程序结束时,各个线程都得以执行清理任务,保障程序的有序退出和资源释放。
多线程部分的代码如下:
def loop1():
    '''esp32cam image'''
    global img
    while not exit_flag:
        ...
        img = ...
    print('loop1 exit normally')

def loop2():
    '''opencv processing'''
    while not exit_flag:
        ... = img.copy()
        ... = result_c.copy()
        ... = result_d.copy()
    print('loop2 exit normally')

def loop3():
    '''modelscope processing'''
    global result_c
    global result_d
    while not exit_flag:
        ...
        result_c = ...
        ...
        result_d = ...
    print('loop3 exit normally')

if __name__ == '__main__':
    '''loop1 initialization'''
    img = ...

    '''loop3 initialization'''
    result_c = ...
    result_d = ...

    # 初始化控制线程正常退出的标志位
    exit_flag = False
    # 创建线程
    t1 = threading.Thread(target=loop1)
    t2 = threading.Thread(target=loop2)
    t3 = threading.Thread(target=loop3)
    # 启动线程
    t1.start()
    t2.start()
    t3.start()
    # 等待用户输入 q (阻塞等待)
    keyboard.wait('q')
    # 如果用户输入 q 则置标志位为True,告知线程退出循环
    exit_flag = True
    # 等待线程结束
    t1.join()
    t2.join()
    t3.join()
    print('main thread exit normally')
按下q后,各个线程常见的退出过程(命令行窗口):
KeyboardEvent(q down)
loop2 exit normally
loop1 exit normally
{'scores': array([], dtype=float32), 'labels': [], 'boxes': array([], shape=(0, 5), dtype=float32)}
loop3 exit normally
main thread exit normally
在上位机端,首先需要解析ESP32-CAM发回来的MJPEG视频流或JPG图像。在此给出两种解析方法,一种直接解析MJPEG视频流,另一种循环解析JPEG图像。
def loop1():
    '''esp32cam image mjpeg'''
    global img
    r = requests.get(url+'cam.mjpeg', stream=True)
    if(r.status_code == 200):
        bytes = builtins.bytes()
        for chunk in r.iter_content(chunk_size=1024):
            bytes += chunk
            a = bytes.find(b'\xff\xd8')
            b = bytes.find(b'\xff\xd9')
            if a != -1 and b != -1:
                jpg = bytes[a:b+2]
                bytes = bytes[b+2:]
                img = cv2.imdecode(np.fromstring(jpg, dtype=np.uint8), cv2.IMREAD_COLOR)
            if exit_flag:
                break
    else:
        print("Received unexpected status code {}".format(r.status_code))
    print('loop1 exit normally')
def loop1():
    '''esp32cam image jpg'''
    global img
    while not exit_flag:
        try:
            imgResp=urllib.request.urlopen(url+'cam-hi.jpg')
            imgNp=np.array(bytearray(imgResp.read()),dtype=np.uint8)
            img=cv2.imdecode(imgNp,-1)
        except urllib.error.URLError as e:
            print(e.reason)
            pass
    print('loop1 exit normally')
上位机的OpenCV用于视频显示,以及把模型推理的结果叠加到视频画面中的功能。
while True:
    cv2.imshow('test',img)
    if ord('q')==cv2.waitKey(10):
		exit(0)
cv2.putText()不支持显示中文,需要先转为PIL格式,用PIL库实现中文显示,再转换回OpenCV格式。
def cv2AddChineseText(img, text, position, textColor=(0, 255, 0), textSize=30):
    if (isinstance(img, np.ndarray)):  # 判断是否OpenCV图片类型
        img = Image.fromarray(cv2.cvtColor(img, cv2.COLOR_BGR2RGB))
    # 创建一个可以在给定图像上绘图的对象
    draw = ImageDraw.Draw(img)
    # 字体的格式
    fontStyle = ImageFont.truetype("simsun.ttc", textSize, encoding="utf-8")
    # 绘制文本
    draw.text(position, text, textColor, font=fontStyle)
    # 转换回OpenCV格式
    return cv2.cvtColor(np.asarray(img), cv2.COLOR_RGB2BGR)
在计算机视觉和机器学习领域中,目标检测框的可视化是一项关键任务。这一过程对于直观理解和评估目标检测算法的性能至关重要。通过使用Python和相关的图像处理库,我们可以轻松实现目标检测框的可视化。本项目中,目标检测框可视化模块被封装在vis.py中的vis_det_img方法中。
vis_det_img的实现方式总结如下:
目标绘制: 通过循环遍历检测结果中的目标,提取每个目标的坐标信息,并使用 OpenCV 库的 rectangle 方法在图像上绘制矩形框,表示目标的位置。
标签添加: 对于每个目标框,使用 OpenCV 的文本绘制方法,将目标的标签信息(类别标签和置信度)添加到图像上,以便在可视化中展示更多信息。
颜色处理: 通过定义颜色处理函数,为每个目标框和标签设置不同的颜色,增强可视化效果。
位置调整: 根据目标框的位置,动态调整标签的位置,以确保标签不会超出图像边界,并保持良好的可读性。
通过简单调用 vis_det_img 方法,可以在图像上直观显示目标检测的结果,有助于更深入地理解和评估算法的性能。
OpenCV操作的完整代码如下:
def loop2():
    '''opencv processing'''
    while not exit_flag:
        img_puttext = img.copy()
        result_c_puttext = result_c.copy()
        result_d_puttext = result_d.copy()
        if model_sel == 'g' or model_sel == 'd' or model_sel == 'r':
            '''image classification'''
            if model_sel == 'g':
                img_puttext = cv2AddChineseText(img_puttext, '垃圾分类', (4, 6), (0, 255, 0), 20)
            elif model_sel == 'd':
                img_puttext = cv2AddChineseText(img_puttext, '日常用品', (4, 6), (0, 255, 0), 20)
            elif model_sel == 'r':
                img_puttext = cv2AddChineseText(img_puttext, '万物识别', (4, 6), (0, 255, 0), 20)
            for i in range(len(result_c_puttext['labels'])):
                text = str(result_c_puttext['labels'][i]) + ' ' + str(result_c_puttext['scores'][i])
                img_puttext = cv2AddChineseText(img_puttext, text, (4, 26 + 20 * i), (0, 255, 0), 20)
        elif model_sel == 'o' or model_sel == 'h' or model_sel == 'f' or model_sel == 'p':
            '''object detection'''
            if model_sel == 'o':
                img_puttext = cv2AddChineseText(img_puttext, '通用目标检测', (4, 6), (0, 255, 0), 20)
            elif model_sel == 'h':
                img_puttext = cv2AddChineseText(img_puttext, '人头检测', (4, 6), (0, 255, 0), 20)
            elif model_sel == 'f':
                img_puttext = cv2AddChineseText(img_puttext, '口罩检测', (4, 6), (0, 255, 0), 20)
            elif model_sel == 'p':
                img_puttext = cv2AddChineseText(img_puttext, '手机检测', (4, 6), (0, 255, 0), 20)
            try:
                img_puttext = vis_det_img(img_puttext, result_d_puttext)
            except cv2.error:
                pass
        cv2.imshow('esp32cam-test',img_puttext)
        if ord('q')==cv2.waitKey(10):
            break
    cv2.destroyAllWindows()
    print('loop2 exit normally')
使用阿里的ModelScope框架搭建深度学习人工神经网络,对ESP32CAM获取到的图片进行模型推理。也可以使用Pytorch等主流框架。
参考ModelScope的官方文档,编写模型推理代码如下:
主线程里的初始化:
    # 导入模型和pipeline(loop3)
    '''image classification'''
    garbage_classification = pipeline(Tasks.image_classification, model='damo/cv_convnext-base_image-classification_garbage')
    dailylife_classification = pipeline(Tasks.image_classification, model='damo/cv_vit-base_image-classification_Dailylife-labels')
    general_recognition = pipeline(Tasks.general_recognition, model='damo/cv_resnest101_general_recognition')

    '''object detection'''
    object_detection = pipeline(Tasks.image_object_detection,model='damo/cv_tinynas_object-detection_damoyolo')
    head_detection = pipeline(Tasks.domain_specific_object_detection, model='damo/cv_tinynas_head-detection_damoyolo')
    facemask_detection = pipeline(Tasks.domain_specific_object_detection, model='damo/cv_tinynas_object-detection_damoyolo_facemask')
    phone_detection = pipeline(Tasks.domain_specific_object_detection, model='damo/cv_tinynas_object-detection_damoyolo_phone')

    # 初始化global result_c和global result_d变量,用于存储模型推理的结果(loop3)
    result_c = {'scores': [0,0,0,0,0], 'labels': ['','','','','']}
    result_d = {'scores': [], 'labels': [], 'boxes': []}
主循环(loop3):
def loop3():
    '''modelscope processing'''
    global result_c
    global result_d
    while not exit_flag:
        if model_sel == 'g' or model_sel == 'd' or model_sel == 'r':
            '''image classification'''
            if model_sel == 'g':
                result_c = garbage_classification(img)
            elif model_sel == 'd':
                result_c = dailylife_classification(img)
            elif model_sel == 'r':
                result_c = general_recognition(img)
            print(result_c)
        elif model_sel == 'o' or model_sel == 'h' or model_sel == 'f' or model_sel == 'p':
            '''object detection'''
            if model_sel == 'o':
                result_d = object_detection(img)
            elif model_sel == 'h':
                result_d = head_detection(img)
            elif model_sel == 'f':
                result_d = facemask_detection(img)
            elif model_sel == 'p':
                result_d = phone_detection(img)
            print(result_d)
    print('loop3 exit normally')
为了搭建带有图像分类/目标检测能力的物联网平台,本项目分为两个部分完成,其中下位机负责数据采集,上位机负责人工神经网络模型推理以及推理结果演示。这种分配方式存在模型推理和数据演示无法分离的问题,对物联网的终端用户不太友好,可能不适用于实际的物联网应用场景。因此本项目提出的改进方案如下:

如图所示,在局域网中添加一个可以运行python程序的中间服务器来负责处理人工神经网络模型推理的任务,则可以实现模型推理与数据交付的分离。最后交付到用户的数据即为模型推理的结果+网络摄像机采集到的视频/图像。
随着物联网、图像分类和目标检测技术的不断发展,它们的综合应用在各个领域呈现出广泛的潜在应用价值。通过结合物联网和视觉智能技术,可以为多个行业带来创新和提升。潜在应用价值主要体现在以下几个方面:
智能监控与安防:在安防领域,利用图像分类和目标检测技术,可以实现对特定目标的实时监测与识别,提高监控系统的智能化和响应速度。
农业领域:应用于农业领域,可以通过图像分类识别植物状况、害虫及病害,为农业生产提供实时的数据支持,实现智能化的农业管理。
智能交通系统:在交通管理中,通过图像分类和目标检测,可以实现对交通流量、车辆违规行为等情况的实时监测,提高交通管理的效率和安全性。
零售业:在零售领域,可以利用图像分类技术实现对商品的实时识别,为智能化的购物体验提供支持,同时通过目标检测确保零售环境的安全。
工业生产:在工业领域,通过监测生产线上的设备状态和产品质量,可以提高生产效率和产品质量,降低生产过程中的人为错误。
医疗领域:应用于医疗领域,可以通过图像分类技术辅助医生进行疾病诊断,同时通过目标检测监测医疗设备的运行状态。
环境监测:在环境保护领域,通过图像分类可以实时监测大气、水域等环境因素,通过目标检测可以监测野生动物的活动情况,为环保工作提供数据支持。
这些潜在的应用领域表明,物联网结合图像分类和目标检测的技术在实际场景中有着广泛的应用前景,不仅能够提高各行业的效率和安全性,还能为人们的生活带来更多便利和智能化体验。因此,本项目的实施将在不同领域中发挥出其潜在的广泛价值。
在本项目中,我基于ESP32-CAM下位机平台和python上位机平台搭建了一个简单的低成本通用图像分类/目标检测物联网平台。
通过本项目,我学到了诸多物联网和人工智能的相关知识。物联网方面,通过学习ESP32-CAM的HTTP通信机制,我了解到了基于WIFI的物联网在工程上的实现方法。人工智能方面,通过学习ConvNeXt、ViT、ResNeSt、DAMO-YOLO等模型,我了解到了计算机视觉领域深度学习中采用多尺度卷积、注意力机制、分离注意力机制以及目标检测相关的前沿技术。
更进一步,我将理论与实践结合,通过下位机cpp代码和上位机python代码的编写,我学习到了多线程、网间进程通信、视频/图像解析、OpenCV可视化、人工神经网络等技术的python实现。
此处可能存在不合适展示的内容,页面不予展示。您可通过相关编辑功能自查并修改。
如您确认内容无涉及 不当用语 / 纯广告导流 / 暴力 / 低俗色情 / 侵权 / 盗版 / 虚假 / 无价值内容或违法国家有关法律法规的内容,可点击提交进行申诉,我们将尽快为您处理。


