

代码拉取完成,页面将自动刷新
项目说明:本项目是根据客户需求开发的一套自动化运维项目,在征得客户同意的情况下,将部分功能开源。本项目配套有完整开发文档,详细记录了项目整个实现过程,可作为学习Django的参考文档。文档以项目为主线,逐步介绍了Django基本类视图、通用类视图和自定义类视图,涵盖了Django核心组件和扩展模块的使用,包括:logging 、signals、simple-history等,同时扩展了celery和channel来实现分布式任务队列和websocket功能等,利用ansible进行集中管理和自动化任务执行。
准备一台centos7的系统作为项目运行的服务器系统,完成基本网络设置、防火墙设置和系统基本优化设置。(以下内容都是在Centos7系统命令行中进行操作)
1、基础配置:使用ssh远程工具(我用的是secureCRT)连接准备好的Centos7系统,完成以下设置:
# 1.修改系统登陆后的提示信息。
# 将motd内容改为:sandboxMP 172.16.3.200 (地址设置成你登陆的系统地址,上下各空一行);
# 这样在登陆系统是的时候就可以看到上面的提示信息,防止登错系统。
[root@template ~]$ vim /etc/motd

sandboxMP 192.168.31.200

# 2.修改主机名,exit退出系统,按回车重新连接系统,就可以看到新的提示信息和主机名
[root@template ~]$ hostnamectl set-hostname sandboxmp
[root@template ~]$ exit
2、安装python3.6:系统中默认带有python2.7,项目中使用的是python3.6.6
# 1.可以去官网下载python3.6.6(Source release Gzip),也可以在linux下使用wget下载
[root@sandboxmp ~]$ yum -y install wget
[root@sandboxmp ~]$ wget https://www.python.org/ftp/python/3.6.6/Python-3.6.6.tgz

# 2.安装pip和环境依赖包
[root@sandboxmp ~]$ yum -y install epel-release
[root@sandboxmp ~]$ yum -y install python-pip
[root@sandboxmp ~]$ pip install --upgrade pip
[root@sandboxmp ~]$ yum install -y zlib zlib-devel --setopt=protected_multilib=false
[root@sandboxmp ~]$ yum install -y bzip2 bzip2-devel openssl openssl-devel ncurses ncurses-devel sqlite sqlite-devel readline readline-devel gcc make python-devel

# 3.安装python3.6(编译安装完成执行 echo $? 返回0安装成功,否则安装出错)
[root@sandboxmp ~]$ tar -zvxf Python-3.6.6.tgz
[root@sandboxmp ~]$ cd Python-3.6.6
[root@sandboxmp Python-3.6.6 ~]$ ./configure
[root@sandboxmp Python-3.6.6 ~]$ make && make install
[root@sandboxmp Python-3.6.6 ~]$ echo $?
0

# 4.安装成功后,就可以使用python3环境
[root@sandboxmp Python-3.6.6 ~]$ cd ~
[root@sandboxmp ~]$ python3
Python 3.6.6 (default, Nov 26 2018, 16:19:34)
''''''
>>> exit()  # 退出python环境
3、安装python虚拟环境:在项目中还是使用虚拟环境,项目环境互不影响
# 1.安装 virtualenv virtualenvwrapper
[root@sandboxmp ~]$ pip install virtualenv virtualenvwrapper

# 2.设置环境变量,使用vim编辑.bashrc在最后面添加最后两行内容
[root@sandboxmp ~]$ vim ~/.bashrc
# .bashrc

# User specific aliases and functions

alias rm='rm -i'
alias cp='cp -i'
alias mv='mv -i'

# Source global definitions
if [ -f /etc/bashrc ]; then
        . /etc/bashrc
fi
# 下面两行是新增加内容
export WORKON_HOME=$HOME/.virtualenvs
source /usr/bin/virtualenvwrapper.sh

# 3.保存修改,退出vim,运行命令让变量生效
[root@sandboxmp ~]$ source ~/.bashrc

# 4.现在可以在bash窗口使用mkvirtualnev来创建虚拟环境了
[root@sandboxmp ~]$ mkvirtualenv -p /usr/local/bin/python3.6 sandboxMP
Running virtualenv with interpreter /usr/local/bin/python3.6
Using base prefix '/usr/local'
New python executable in /root/.virtualenvs/sandboxMP/bin/python3.6
Also creating executable in /root/.virtualenvs/sandboxMP/bin/python
Installing setuptools, pip, wheel...
done.
......

# 5.创建完成系统自动进入了虚拟环境sandboxMP
(sandboxMP) [root@sandboxmp ~]$

# 6.离开虚拟环境
(sandboxMP) [root@sandboxmp ~]$ deactivate
[root@sandboxmp ~]$

# 7.查看虚拟环境
[root@sandboxmp ~]$ workon
sandboxMP
[root@sandboxmp ~]$

# 8.激活虚拟环境
[root@sandboxmp ~]$ workon sandboxMP
(sandboxMP) [root@sandboxmp ~]$
通过上面配置,指定使用python3.6来创建一个虚拟环境,虚拟环境名称为sandboxMP,虚拟环境存放的目录在/root/.virtualenvs目录下,这个是由上一步环境变量设置的。
在准备好的Centos7系统中安装mysql/redis/mongodb,当然数据库也可以和应用分开单独安装。
在Centos7系统中更新yum源文件,安装myslq,创建项目数据库:
# 1.安装Mysql
[root@sandboxmp ~]$ wget http://repo.mysql.com/mysql-community-release-el7-5.noarch.rpm
[root@sandboxmp ~]$ rpm -ivh mysql-community-release-el7-5.noarch.rpm
[root@sandboxmp ~]$ yum -y update
[root@sandboxmp ~]$ yum install -y mysql-server

# 2.修改配置文/etc/my.cnf,在[mysql]标签下添加后面三行内容,保存退出vim
[root@sandboxmp ~]$ vim /etc/my.cnf
[mysqld]
collation-server = utf8_unicode_ci
character_set_server=utf8
init_connect='SET NAMES utf8'

# 3.启动mysql,设置开机启动,为root用户设置密码
[root@sandboxmp ~]$ systemctl start mysqld
[root@sandboxmp ~]$ systemctl enable mysqld
[root@sandboxmp ~]$ mysql

mysql> set password for 'root'@'localhost'=password('1234@abcd.com');
mysql> exit

# 4.再次连接Mysql会提示要使用密码,连接方式如下,回车,根据提示输入密码
[root@sandboxmp ~]$ mysql -uroot -p
Enter password:
Welcome to the MySQL monitor.  Commands end with ; or \g.
''''''
mysql>

# 5.创建数据库,添加用户和访问授权
mysql> CREATE DATABASE sandboxMP;
mysql> GRANT ALL PRIVILEGES ON sandboxMP.* TO 'ddadmin'@'%' IDENTIFIED BY '1234@abcd.com';
mysql> GRANT ALL PRIVILEGES ON sandboxMP.* TO 'ddadmin'@'localhost' IDENTIFIED BY '1234@abcd.com';
项目中会使用celery来做分布式任务队列,用来处理比较耗时的操作,例如发送邮件,资产扫描等操作。我们使用redis来做中间人,用来存储任务队列和接受返回值。 在服务器中,执行下面命令安装redis:
# 1.安装扩展源(前面我们已经安装过扩展源epel-release)和redise
[root@sandboxmp ~]$ yum install epel-release
[root@sandboxmp ~]$ yum install redis

# 2.修改redis配置文件找到bind去掉前面的注释符号,ip改为0.0.0.0,保存退出
[root@sandboxmp ~]$ vim /etc/redis.conf
bind 0.0.0.0

# 3.启动redise和设置开机启动
[root@sandboxmp ~]$ systemctl start redis
[root@sandboxmp ~]$ systemctl enable redis
项目中mongodb用来存储日志信息,安装方法如下:
# 1.配置yum源文件,添加mongo安装源,保存退出
[root@sandboxmp ~]$ vim /etc/yum.repos.d/mongo.repo
[mongodb-org-3.4]
name=MongoDB 3.4 Repository
baseurl=https://repo.mongodb.org/yum/redhat/$releasever/mongodb-org/3.4/x86_64/
gpgcheck=0
enabled=1

# 2.安装mongodb, 修改bindIp(把地址改成0.0.0.0后,保存退出)
[root@sandboxmp ~]$ yum install -y mongodb-org
[root@sandboxmp ~]$ vim /etc/mongod.conf
bindIp 0.0.0.0 # 修改bindIp

# 3.启动mongodb,设置开始启动
[root@sandboxmp ~]$ systemctl start mongod
[root@sandboxmp ~]$ systemctl enable mongod
项目运行需要安装必要的依赖包,所有依赖包都记录在项目文件中:sandboxMP/requirements/pro.txt 。
登陆服务器系统,使用git命令克隆项目到本地(如果没有git命令需要先安装git:yum -y install git):
# 1.创建/opt/app目录,用来存放项目文件
[root@sandboxmp ~]$ mkdir /opt/app
[root@sandboxmp ~]$ cd /opt/app
# 2.克隆项目到本地
[root@sandboxmp app]$ git clone https://github.com/RobbieHan/sandboxMP.git
Cloning into 'sandboxMP'...
remote: Enumerating objects: 134, done.
remote: Counting objects: 100% (134/134), done.
remote: Compressing objects: 100% (57/57), done.
remote: Total 2041 (delta 96), reused 81 (delta 76), pack-reused 1907
Receiving objects: 100% (2041/2041), 7.67 MiB | 16.00 KiB/s, done.
Resolving deltas: 100% (663/663), done.
==对于无法访问github的朋友可以从码云上克隆项目:==
# 进入到/opt/app目录,执行下面命令从码云克隆项目到本地:
[root@sandboxmp app]$ git clone https://gitee.com/RobbieHan/sandboxMP.git
项目克隆到本地后,进入python虚拟环境,使用pip安装项目依赖包:
# 1.进入python虚拟环境
[root@sandboxmp ~]$ workon sandboxMP
# 2.防止安装mysqlclient报错:EnvironmentError: mysql_config not found,先安装下面两个包
(sandboxMP) [root@sandboxmp ~]$ yum -y install mysql-devel libmysqlclient-dev
# 3.安装 /opt/app/sandboxMP/requirements/pro.txt文件中所有依赖包
(sandboxMP) [root@sandboxmp ~]$ pip install -r /opt/app/sandboxMP/requirements/pro.txt
项目做了自定义的权限管理,更具用户角色权限来动态生成导航数据,所以在运行像目前,需要生成数据表并导入初始数据。
# 1. 从模型生成数据表(以下命令在服务器虚拟环境中执行)
(sandboxMP) [root@sandboxmp ~]$cd /opt/app/sandboxMP # 进入项目目录
(sandboxMP) [root@sandboxmp sandboxMP]$ python manage.py makemigrations
Migrations for 'cmdb':
  apps/cmdb/migrations/0001_initial.py
    - Create model Cabinet
    - Create model Code
    - Create model ConnectionInfo
    - Create model DeviceFile
    - Create model DeviceInfo
    - Create model DeviceScanInfo
    - Create model HistoricalDeviceInfo
    - Add field device to devicefile
(sandboxMP) [root@sandboxmp sandboxMP]$ python manage.py migrate
Operations to perform:
  Apply all migrations: admin, auth, cmdb, contenttypes, sessions, system
Running migrations:
  Applying contenttypes.0001_initial... OK
  '''输出信息省略'''

# 2.导入基础数据内容,更具提示信息输入密码(默认:1234@abcd.com)
(sandboxMP) [root@sandboxmp sandboxMP]$ mysql -uroot -p sandboxMP < config/basic_data_20190225.sql
Enter password:
(sandboxMP) [root@sandboxmp sandboxMP]$
注意: sandboxMP/sandboxMP/settings.py中数据库连接设置的是本地地址:127.0.0.1,请根据实际配置进行调整。
环境部署到这里可以在命令行使用manage.py工具临时运行项目。
==测试项目运行:==
# 在虚拟环境下,进入到项目目录,使用manage.py临时运行项目:
(sandboxMP) [root@sandboxmp sandboxMP]$ python manage.py runserver 0.0.0.0:80
Performing system checks...

System check identified no issues (0 silenced).
February 25, 2019 - 19:58:19
Django version 2.1.5, using settings 'sandboxMP.settings'
Starting development server at http://0.0.0.0:80/
Quit the server with CONTROL-C.
使用你的服务器地址访问项目(确认系统防火墙有没有限制80端口):
http://172.16.3.200 # 导入的基础数据包含一个默认管理员:admin 密码:!qaz@wsx
登录系统后可以点击导航菜单,访问对应功能。确认项目环境和项目运行没有问题后在服务器中按 CTRL + C 终止运行。
项目中使用了一些工具例如:Nmap,异步任务使用的:Celery,进程管理使用的:Supervisor,扫描执行和集中管理使用的密钥认证登录等配置。
登录服务器使用yum安装nmap工具,nmap的基本使用【Django实战2-自动化运维之配置管理-08:资产扫描工具的使用】
[root@sandboxmp ~]$ yum -y install nmap
本项目提供的扫描执行和集中管理功能支持密钥认证方式,如果要使用密钥认证来登录管理远程主机,需要设置密钥认证。
1、在项目部署的服务器上创建密钥文件:
# 使用 ssh-keygen创建密钥文件,执行命令后,一路回车。生成的密钥文件默认存放在/root/.ssh目录中
[root@sandboxmp ~]# ssh-keygen
Generating public/private rsa key pair.
Enter file in which to save the key (/root/.ssh/id_rsa):
Enter passphrase (empty for no passphrase):
Enter same passphrase again:
Your identification has been saved in /root/.ssh/id_rsa.
Your public key has been saved in /root/.ssh/id_rsa.pub.
The key fingerprint is:
SHA256:dn0G8JVMN6Qby6JhZhFaMzOQ19ko5y518FIGsds5Pbg root@sandboxmp
The key's randomart image is:
+---[RSA 2048]----+
|       .oBoo*o++.|
|       .oo*O.=+..|
|       ...+.Bo   |
|          .=++B  |
|        S=+o+Ooo |
|       .+oo..oo .|
|         ..  E   |
|                 |
|                 |
+----[SHA256]-----+
2、在需要管理的远程终端中配置允许密钥登录:
# 1.修改sshd_config配置文件内容,去掉下面内容的注释,保存退出
[root@server1 ~]$ vim /etc/ssh/sshd_config

RSAAuthentication yes
PubkeyAuthentication yes
AuthorizedKeysFile .ssh/authorized_keys  # 认证授权默认存放位置

[root@server1 ~]$ systemctl restart sshd

# 2.生成公钥私钥文件,执行下面命令然后一路回车
[root@server1 ~]$ ssh-keygen
  Generating public/private rsa key pair.
Enter file in which to save the key (/root/.ssh/id_rsa):
Created directory '/root/.ssh'.
Enter passphrase (empty for no passphrase):
Enter same passphrase again:
Your identification has been saved in /root/.ssh/id_rsa.
Your public key has been saved in /root/.ssh/id_rsa.pub.
The key fingerprint is:
be:02:d5:03:c3:bc:64:22:90:a1:12:1f:64:16:76:4e root@server1
The key's randomart image is:
+--[ RSA 2048]----+
|+=B.Eo           |
|o*.=. B          |
|o ...+ =         |
|.     o o        |
|     .  S.       |
|    .  .         |
|     .  .        |
|      .  .       |
|       ..        |
+-----------------+
# 3.这时候已经在/root/.ssh目录下生成了密钥文件
[root@server1 ~]$ ls -l .ssh
total 8
-rw------- 1 root root 1679 Dec  2 19:59 id_rsa
-rw-r--r-- 1 root root  394 Dec  2 19:59 id_rsa.pub

# 4. 创建认证文件,设置访问权限,authorized_keys是sshd_config中配置的认证授权默认存放位置

[root@server1 .ssh]$ touch authorized_keys
[root@server1 .ssh]$ chmod 600 authorized_keys
[root@server1 .ssh]$ ls -l
total 12
-rw------- 1 root root  396 Dec  2 20:05 authorized_keys
-rw------- 1 root root 1679 Dec  2 19:59 id_rsa
-rw-r--r-- 1 root root  394 Dec  2 19:59 id_rsa.pub
[root@server1 .ssh]$
3、将项目部署服务器的公钥写入远程终端的认证文件:authorized_keys
[root@sandboxmp ~]$ cat ~/.ssh/id_rsa.pub | ssh root@172.16.3.101 'cat >> .ssh/authorized_keys'
The authenticity of host '172.16.3.101 (172.16.3.101)' can't be established.
ECDSA key fingerprint is SHA256:6veR9N0x60mE73zxt+N7sesJrlAEatHK9/UkXHeAd3Y.
ECDSA key fingerprint is MD5:17:89:88:88:25:6e:ca:c9:f8:19:45:3e:c4:2f:d7:bf.
Are you sure you want to continue connecting (yes/no)? yes # 首次登录需要输入yes确认
Warning: Permanently added '172.16.3.101' (ECDSA) to the list of known hosts.
root@172.16.3.101's password:  # 输入远程主机的密码
[root@sandboxmp ~]$
代码中172.16.3.101是服务器需要管理的远程终端的IP地址,首次SSH连接远程主机需要输入yes确认连接,根据提示输入密码后成功写入公钥到远程终端。
在此通过项目服务器SSH连接到远程终端,已经不需要再输入密码了,可以直接通过密钥完成认证:
[root@sandboxmp ~]$ ssh root@172.16.3.101
Last login: Wed Feb 20 17:53:16 2019 from 172.16.3.200

server01 172.16.3.101


[root@server01 ~]#      # 成功登陆到远程终端,命令行提示符显示的是server01
[root@server01 ~]# exit # 退出远程终端连接
logout
Connection to 172.16.3.101 closed.
[root@sandboxmp ~]#
设备扫描功能使用了celery做的任务队列,进行异步扫描,同时又使用到Flower来监控任务队列。为了方便管理,在项目中使用了Supervisor来管理进程数据。
项目文件中已经做好了celery的配置和任务队列配置,所以只需要使用Supervisor将进程管理起来即可。
安装Supervisor可以直接使用pip install supervisor来安装(不支持python3.6),也可以使用yum install 来安装。
# 在项目部署的服务器上安装supervisor
[root@sandboxmp ~]$ yum -y install supervisor
项目中使用yum方式来安装supervisor,安装后会自带配置文件,可以通过systemctl 来管理supervisor进程。
1、查看项目部署服务器上的Supervisord配置文件:
[root@sandboxmp /]$ cat /etc/supervisord.conf
'''以上内容省略'''
[include]
files = supervisord.d/*.ini
可以看到,配置文件中导入了supervisord.d目录下的所有.ini格式文件,所以我们可以把进程管理的配置文件放到这个目录。
2、创建子进程管理配置文件
在项目部署的服务器中创建子进程管理文件,来管理celer任务进程和flower进程:
# 编辑进程管理配置文件
[root@sandboxmp ~]$ touch /etc/supervisord.d/celery_worker.ini
[root@sandboxmp ~]$ vim /etc/supervisord.d/celery_worker.ini

# 将以下内容写入配置文件保存并退出
[program:celery-worker]
command=/root/.virtualenvs/sandboxMP/bin/celery worker -A sandboxMP -l INFO
directory=/opt/app/sandboxMP
environment=PATH="/root/.virtualenvs/sandboxMP/bin/"
stdout_logfile=/opt/app/sandboxMP/slogs/celery_worker.log
stderr_logfile=/opt/app/sandboxMP/slogs/celery_worker.log
autostart=true
autorestart=true
priority=901

[program:celery-flower]
command=/root/.virtualenvs/sandboxMP/bin/celery flower --broker=redis://localhost:6379/0
directory=/opt/app/sandboxMP
environment=PATH="/root/.virtualenvs/sandboxMP/bin/"
stdout_logfile=/opt/app/sandboxMP/slogs/celery_flower.log
stderr_logfile=/opt/app/sandboxMP/slogs/celery_flower.log
autostart=true
autorestart=true
priority=900
3、启动Supervisord
[root@sandboxmp ~]$ systemctl start supervisord  # 启动supervisord
[root@sandboxmp ~]$ systemctl enable supervisord # 加到开机启动
4、使用supervisorctl管理工具
启动supervisord服务后,supervisor会读取配置文件中的子进程配置,并启动celery-worker和celery-flower进程。Supervisor为我们提供了一个子进程管理工具:supervisorctl来管理这些进程数据:
[root@sandboxmp /]$ supervisorctl # 启用子进程管理工具,系统会打印当前子进程状态
celery-flower                    RUNNING   pid 4007, uptime 0:05:13
celery-worker                    RUNNING   pid 4008, uptime 0:05:13
supervisor> status # 查看子进程状态
celery-flower                    RUNNING   pid 4007, uptime 0:05:17
celery-worker                    RUNNING   pid 4008, uptime 0:05:17
supervisor> stop celery-flower # 停止子进程,stop all 停止所有
celery-flower: stopped
supervisor> status
celery-flower                    STOPPED   Jan 18 03:27 PM
celery-worker                    RUNNING   pid 4008, uptime 0:05:32
supervisor> start celery-flower # 启动子进程
celery-flower: started
supervisor> help   # 查看帮助

default commands (type help <topic>):
=====================================
add    clear  fg        open  quit    remove  restart   start   stop  update
avail  exit   maintail  pid   reload  reread  shutdown  status  tail  version
为了使用Celery任务队列功能,需要确保celery-flower和celery-worker进程状态都是RUNNING。如果有问题请查看对应日志文件(在配置子进程的时候指定了日志存储路径)
完成功能环境配置后,可以在项目服务器中临时运行项目,然后登陆系统,测试设备扫描功能,查看任务队列是否可以正常执行。
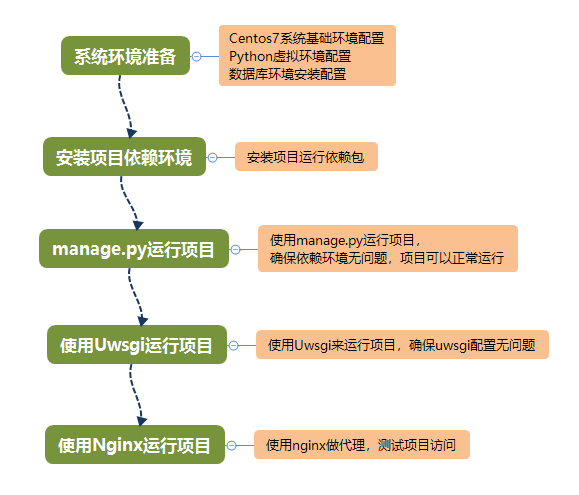
项目部署使用uwsgi来做Web服务,Nginx做代理并提供静态资源访问和简单缓存功能。一般项部署项目上线,我会分步骤进行,这样在遇到问题也清楚是哪一个环节出的问题,可以有针对性的进行排错。部署过程如下图所示:
经过前面的部署,已经准备好了系统环境、项目以来环,并确认项目可以正常运行,接下来使用uwsgi来运行项目。
1、登陆服务器系统,进入虚拟环境,安装uwsgi
[root@sandboxmp ~]# workon sandboxMP
(sandboxMP) [root@sandboxmp ~]$ pip install uwsgi
2、设置Uwsgi配置文件
(sandboxMP) [root@sandboxmp ~]$ vim /etc/smp_uwsgi.ini
[uwsgi]
http = 172.16.3.200:9000
#socket = 127.0.0.1:9000
chdir = /opt/app/sandboxMP
module = sandboxMP.wsgi
static-map=/static=/opt/app/sandboxMP/static
#daemonize =/var/log/uwsgi.log
master = Ture
vacuum = True
processes = 4
threads = 2
buffer-size=32768
配置说明:
注意:配置文件中设置http,是为了方便使用Uswgi启动项目后,进行访问和功能测试。
3、使用配置文件启动Uwsgi
# 注意:uwsgi是安装在虚拟环境的,要使用uwsgi命令需要先进入虚拟环境
(sandboxMP) [root@sandboxmp ~]$ uwsgi /etc/smp_uwsgi.ini
[uWSGI] getting INI configuration from /etc/smp_uwsgi.ini
[uwsgi-static] added mapping for /static => /opt/app/sandboxMP/static
*** Starting uWSGI 2.0.18 (64bit) on [Mon Feb 25 23:21:01 2019] ***
compiled with version: 4.8.5 20150623 (Red Hat 4.8.5-36) on 25 February 2019 14:10:29
'''中间启动内容省略'''
spawned uWSGI master process (pid: 17054)
spawned uWSGI worker 1 (pid: 17058, cores: 2)
spawned uWSGI worker 2 (pid: 17060, cores: 2)
spawned uWSGI worker 3 (pid: 17061, cores: 2)
spawned uWSGI worker 4 (pid: 17063, cores: 2)
spawned uWSGI http 1 (pid: 17064)
项目运行成功通过服务器地址:http://172.16.3.200:9000就可以访问项目了,使用默认用户名: admin,密码:!qaz@wsx 登陆系统,测试系统功能。
至此,确认完Uwsgi配置没有问题,可以正常启动项目,然后终止Uwsgi运行(在命令行使用CTRL + C)。
4、修改Uwsgi配置文件
上面的配置是为了方便测试Uwsgi运行项目,线上部署项目,采用socket模式,使用nginx来处理静态文件访问:
[uwsgi]
#http = 172.16.3.200:9000
socket = 127.0.0.1:9000
chdir = /opt/app/sandboxMP
module = sandboxMP.wsgi
#static-map=/static=/opt/app/sandboxMP/static
#daemonize =/var/log/uwsgi.log
master = Ture
vacuum = True
processes = 4
threads = 2
buffer-size=32768
配置中注销了http和static-map配置,同时启用socket配置。这时你也可以在命令行使用新的配置文件启动下uwsgi看看运行状态,不过这时候外面是无法通过uwsgi来直接访问系统了,还需要配置nginx代理。
5、使用supervisor来管理uwsgi进程
在前面已经使用supervisor来管理celery任务进程和flower进程,同样也可以使用supervisor来管理uwsgi进程:
# 1.新建一个进程文件sandboxmp_uwsgi,写入下面配置内容:
(sandboxMP) [root@sandboxmp ~]$ vim /etc/supervisord.d/sandboxmp_uwsgi.ini
[program:sandboxmp-uwsgi]
command=/root/.virtualenvs/sandboxMP/bin/uwsgi /etc/smp_uwsgi.ini
stdout_logfile=/var/log/uwsgi/smp_uwsgi.log
stderr_logfile=/var/log/uwsgi/smp_uwsgi.log
stdout_logfile_maxbytes = 20MB
autostart=true
autorestart=true
priority=905

# 2.创建一个目录用来存放uwsgi日志
(sandboxMP) [root@sandboxmp ~]$  mkdir /var/log/uwsgi

# 3.启动sandboxmp_uwsgi进程
(sandboxMP) [root@sandboxmp ~]# supervisorctl reload
Restarted supervisord

# 4. 稍微等待一会,然后查看进程状态:
(sandboxMP) [root@sandboxmp ~]# supervisorctl status
celery-flower                    RUNNING   pid 17231, uptime 0:00:05
celery-worker                    RUNNING   pid 17232, uptime 0:00:05
sandboxmp-uwsgi                  RUNNING   pid 17233, uptime 0:00:05

# 5.查看服务状态
(sandboxMP) [root@sandboxmp ~]# netstat -tnpl
Active Internet connections (only servers)
Proto Recv-Q Send-Q Local Address    Foreign Address    State       PID/Program name
tcp 0      0     127.0.0.1:9000           0.0.0.0:*     LISTEN      17233/uwsgi
通过上面的配置,已经成功使用supervisor管理了sandboxmp-uwsgi进程。
1、安装nginx
(sandboxMP) [root@sandboxmp ~]$ yum -y install nginx
2、修改nginx配置文件
(sandboxMP) [root@sandboxmp ~]$ echo "" > /etc/nginx/nginx.conf
(sandboxMP) [root@sandboxmp ~]$ vim /etc/nginx/nginx.conf
worker_processes  1;
events {
    worker_connections  1024;
}
http {

    include mime.types;
    default_type application/octet-stream;
    server_tokens off;
    log_format  main  '$remote_addr - $remote_user [$time_local] "$request" '
                      '$status $body_bytes_sent "$http_referer" '
                      '"$http_user_agent" "$http_x_forwarded_for"';
    log_format nginxlog '$http_host '
                        '$remote_addr [$time_local] '
                        '"$request" $status $body_bytes_sent '
                        '"$http_referer" "$http_user_agent" '
                        '$request_time '
                        '$upstream_response_time';
    access_log /var/log/nginx/access.log nginxlog;
    keepalive_timeout  60;
    client_header_timeout 10;
    client_body_timeout 15;
    client_max_body_size 100M;
    client_body_buffer_size 1024k;
    gzip  on;
    gzip_min_length 1;
    gzip_buffers 4 16k;
    gzip_http_version 1.1;
    gzip_comp_level 3;
    gzip_types text/plain application/javascript application/x-javascript text/css application/xml text/javascript application/x-httpd-php image/jpeg image/gif image/png app  lication/vnd.ms-fontobject application/x-font-ttf image/svg+xml;
    gzip_vary on;


    upstream sandboxmp {
          server  127.0.0.1:9000;
   }

    server {

        listen 80;
        server_name 0.0.0.0;
        charset       utf-8;
        client_max_body_size 75M;


        location /static {

         alias /opt/app/sandboxMP/static;

          }

        location /media {

          alias /opt/app/sandboxMP/media;
          }

        location / {
          uwsgi_pass  sandboxmp;
          include  /etc/nginx/uwsgi_params;
         }
    }
}
nginx配置说明:
在nginx中配置了日志格式,应用代理和静态文件的代理访问。
3、启动nginx服务,设置开机启动
(sandboxMP) [root@sandboxmp ~]# systemctl start nginx
(sandboxMP) [root@sandboxmp ~]# systemctl enable nginx
Created symlink from /etc/systemd/system/multi-user.target.wants/nginx.service to /usr/lib/systemd/system/nginx.service.
项目在开发的时候是启用了Debug模式的,现在部署上线了,可以关闭Debug。
# 1.修改项目配置文件,将DEBUG内容改成False
(sandboxMP) [root@sandboxmp ~]$ vim /opt/app/sandboxMP/sandboxMP/settings.py
'''配置文件中内容省略,主要修改下面两个内容'''
DEBUG = False

ALLOWED_HOSTS = ['*']

# 2.保存修改后,重启项目
(sandboxMP) [root@sandboxmp ~]$ supervisorctl restart sandboxmp-uwsgi
sandboxmp-uwsgi: stopped
sandboxmp-uwsgi: started
(sandboxMP) [root@sandboxmp ~]$ systemctl restart nginx
(sandboxMP) [root@sandboxmp ~]$
到这里项目已经部署上线了,可以访问系统地址:http://172.16.3.200 用户名:admin 密码:!qaz@wsx 使用项目功能。本文档中配置文件已经包含在项目master版本文件中:sandboxMP/config。
更多实战类文档,请关注我的知识星球: https://t.zsxq.com/a6IqBMr (微信中打开链接)
轻量级办公管理系统项目开源地址:https://github.com/RobbieHan/gistandard
此处可能存在不合适展示的内容,页面不予展示。您可通过相关编辑功能自查并修改。
如您确认内容无涉及 不当用语 / 纯广告导流 / 暴力 / 低俗色情 / 侵权 / 盗版 / 虚假 / 无价值内容或违法国家有关法律法规的内容,可点击提交进行申诉,我们将尽快为您处理。


