

代码拉取完成,页面将自动刷新
Loguru: 更为优雅、简洁的Python 日志管理模块
安装模块
pip install loguru
怎么使用?
from loguru import logger

logger.info("信息级别的日志")
logger.warning("警告级别的日志")
logger.debug("调试级别的日志")
logger.error("错误级别的日志")
效果:

简介:
ConfigParser 是用来读取配置文件的包。
安装模块
pip install configparser
配置文件格式:
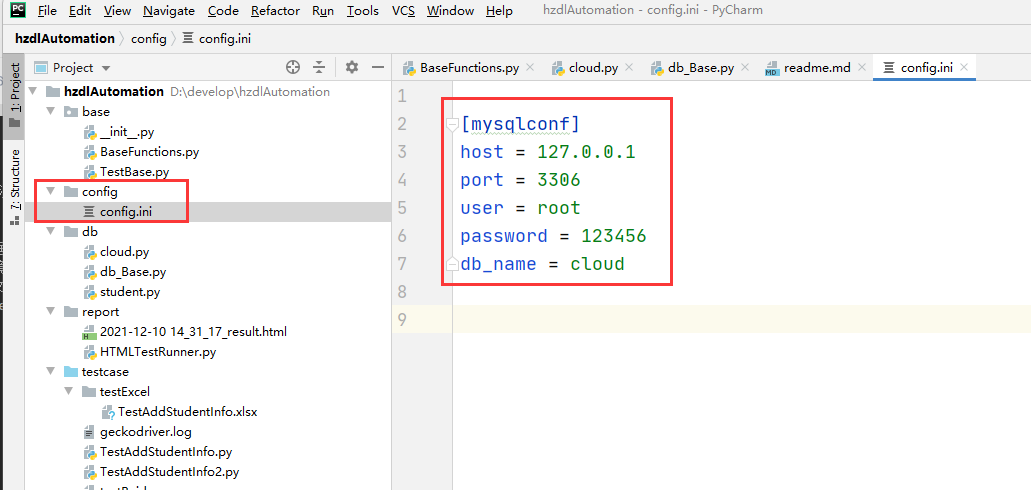
配置文件可以以.ini结尾的文件,如框架中的config.ini文件
括号“[ ]”内包含的为section。紧接着section 为类似于key-value 的options 的配置内容。
在框架中主要更改所有与数据库、邮件等等各方面的配置数据,进行统一更改
[mysqlconf]
host = 127.0.0.1
port = 3306
user = root
password = 123456
db_name = cloud
读取配置文件代码:
import configparser as cparser

# --------- 读取config.ini配置文件 ---------------
cf = cparser.ConfigParser()
cf.read("../config/config.ini",encoding='UTF-8')
host = cf.get("mysqlconf","host")
port = cf.get("mysqlconf","port")
user = cf.get("mysqlconf","user")
password = cf.get("mysqlconf","password")
db = cf.get("mysqlconf","db_name")
针对excel进行处理; 框架中使用excel进行数据驱动,所有用例的测试数据都放到excel文档中,利用openpyxl模块对用例文件进行读取,并驱动测试执行。
安装模块
pip install openpyxl
先思考一个问题,以下两段代码优劣?
from selenium import webdriver
import unittest
from time import sleep

class TestBaidu(unittest.TestCase):
    def setUp(self) -> None:
        self.driver = webdriver.Firefox()
        self.driver.implicitly_wait(10)
        self.driver.get("http://www.baidu.com")
        sleep(3)
    def tearDown(self) -> None:
        self.driver.close()

    def test_Login1(self):
        """正确登录"""
        self.driver.find_element_by_id("s-top-loginbtn").click()
        sleep(3)
        self.driver.find_element_by_id("TANGRAM__PSP_11__userName").send_keys("username1")
        self.driver.find_element_by_id("TANGRAM__PSP_11__password").send_keys("password1")
        sleep(3)

    def test_Login2(self):
        """密码错误,登录失败"""
        self.driver.find_element_by_id("s-top-loginbtn").click()
        sleep(3)
        self.driver.find_element_by_id("TANGRAM__PSP_11__userName").send_keys("username2")
        self.driver.find_element_by_id("TANGRAM__PSP_11__password").send_keys("password2")
        sleep(3)


if __name__ == '__main__':
    unittest.main()
from selenium import webdriver
import unittest
from time import sleep
from ddt import ddt, unpack,data

@ddt
class TestBaidu(unittest.TestCase):
    def setUp(self) -> None:
        self.driver = webdriver.Firefox()
        self.driver.implicitly_wait(10)
        self.driver.get("http://www.baidu.com")
        sleep(3)
    def tearDown(self) -> None:
        self.driver.close()

    @unpack
    @data(["username1", "password1"], ["username2", "password2"])
    def test_Login1(self, username, password):
        """正确登录"""
        self.driver.find_element_by_id("s-top-loginbtn").click()
        sleep(3)
        self.driver.find_element_by_id("TANGRAM__PSP_11__userName").send_keys(username)
        self.driver.find_element_by_id("TANGRAM__PSP_11__password").send_keys(password)
        sleep(3)


if __name__ == '__main__':
    unittest.main()
DDT: DDT即数据驱动测试,全称data driver test,是根据测试数据表格进行的
安装模块
pip install ddt
DDT中需要用到的几个注解, 例子参照上面代码中的例子
ORM对象关系映射(英语:Object Relational Mapping,简称ORM,或O/RM,或O/R mapping),在实际开发中,程序员使用面向对象的技术操作数据,而当要把数据存储起来时,使用的却是关系型数据库,这样就造成了很多的不便,ORM在对象模型和关系数据库的表之间建立了一座桥梁,有了它,程序员就不需要再使用SQL语句操作数据库中的表,直接操作JavaBean对象就可以实现数据的存储,查询,更改和删除等操作,Hibernate、mybatis、peewee都是属于ORM框架技术
peewee介绍
peewee是一个轻量级的ORM框架,peewee完全可以应对个人或企业的中小型项目的Model层,上手容易,功能强大。
安装模块
pip install peewee
peewee怎么用?
python -m pwiz -e mysql -H 127.0.0.1 -p 3306 -u root -P 123456 test >./db/db.py
                         数据库地址  端口   用户名    密码  数据库名称    生成的文件地址及名称
def insertAdmin(name, account,addId,birthday,card,cityId,companyId,contractTime, createTime, departmentId,
                email, entryTime, lastLoginTime, leaveTime, outDate, phone, positiveTime,
                productId, resetPwdTime, schedule, sex, status, validataCode):
    Admin.insert(account = account,
    add_id = addId,
    birthday = birthday,
    card = card,
    city_id = cityId,
    company_id = companyId,
    contract_time = contractTime,
    create_time = createTime,
    department_id = departmentId,
    email = email,
    entry_time = entryTime,
    last_login_time = lastLoginTime,
    leave_time = leaveTime,
    name = name,
    out_date = outDate,
    phone = phone,
    positive_time = positiveTime,
    product_id = productId,
    reset_pwd_time = resetPwdTime,
    schedule = schedule,
    sex = sex,
    status = status,
    validata_code = validataCode).execute()

def deleteCloudCity(name):
    Admin.delete().where(Admin.name==name).execute()


def updateAdmin(name, addId="",birthday="",card="",cityId="",companyId="",contractTime="", createTime="", departmentId="",
                email="", entryTime="", lastLoginTime="", leaveTime="", outDate="", phone="", positiveTime="",
                productId="", resetPwdTime="", schedule="", sex="", status="", validataCode=""):
    dict = {}
    if addId:
        dict[Admin.add_id] = addId
    if birthday:
        dict[Admin.birthday] = birthday
    if card:
        dict[Admin.card] = card
    if cityId:
        dict[Admin.city_id] = cityId
    if companyId:
        dict[Admin.company_id] = companyId
    if contractTime:
        dict[Admin.contract_time] = contractTime
    if createTime:
        dict[Admin.create_time] = createTime
    if departmentId:
        dict[Admin.department_id] = departmentId
    if email:
        dict[Admin.email] = email
    if entryTime:
        dict[Admin.entry_time] = entryTime
    if lastLoginTime:
        dict[Admin.last_login_time] = lastLoginTime
    if leaveTime:
        dict[Admin.leave_time] = leaveTime
    if outDate:
        dict[Admin.out_date] = outDate
    if phone:
        dict[Admin.phone] = phone
    if positiveTime:
        dict[Admin.positive_time] = positiveTime
    if productId:
        dict[Admin.product_id] = productId
    if resetPwdTime:
        dict[Admin.reset_pwd_time] = resetPwdTime
    if schedule:
        dict[Admin.schedule] = schedule
    if sex:
        dict[Admin.sex] = sex
    if status:
        dict[Admin.status] = status
    if validataCode:
        dict[Admin.validata_code] = validataCode

    StudentInfo.update(dict).where(Admin.name == name).execute()

def selectCloudCity(name):
    return Admin.select().where(Admin.name == name).get()
requests是一个很实用的Python HTTP客户端库,编写爬虫和测试服务器响应数据时经常会用到,Requests是Python语言的第三方的库,专门用于发送HTTP请求
框架中主要使用requests模块对接口进行请求,并且封装了如下方法方便使用,并将response作为字典格式进行返回,方便测试人员进行数据提取验证。
def get(url, data, headers={"Content-Type": "application/x-www-form-urlencoded"}):
    """
    get请求,返回字典格式
    :param url:
    :param data:
    :param headers:
    :return:
    """
    logger.info(f"data:{data}")
    response = requests.get(url, params=data, headers=headers)
    logger.info(f"response:{response.json()}")
    return response.json()
def post(url, data, headers={"Content-Type": "application/x-www-form-urlencoded"}):
    """
    入参是表单格式的post请求,返回字典格式
    :param url:
    :param data:
    :param headers:
    :return:
    """
    logger.info(f"data:{data}")
    response = requests.post(url, data=data, headers=headers)
    logger.info(f"response:{response.json()}")
    return response.json()
def postJSON(url, data, headers={"Content-Type": "application/json"}):
    """
    入参是json格式的post请求,返回字典格式
    :param url:
    :param data:
    :param headers:
    :return:
    """
    headers["Content-Type"] = "application/json"
    logger.info(f"data:{data}")
    response = requests.post(url, data=json.dumps(data, cls=DateEncoder), headers=headers)
    logger.info(f"response:{response.json()}")
    return response.json()
框架中引入HTMLTestRunner模块进行测试报告生成
第一步: 分析一下,做一个接口自动化测试需要做一些什么事情?
第二步:环境安装包括两部分:
①项目运行环境
②框架运行环境
在环境中安装所有用到的第三方模块,确保框架在pycharm中打开无报错:
pip install ddt
pip install peewee
pip install configparser
pip install openpyxl
pip install requests
第三步:更改配置文件中的数据库配置,根据实际情况进行更改
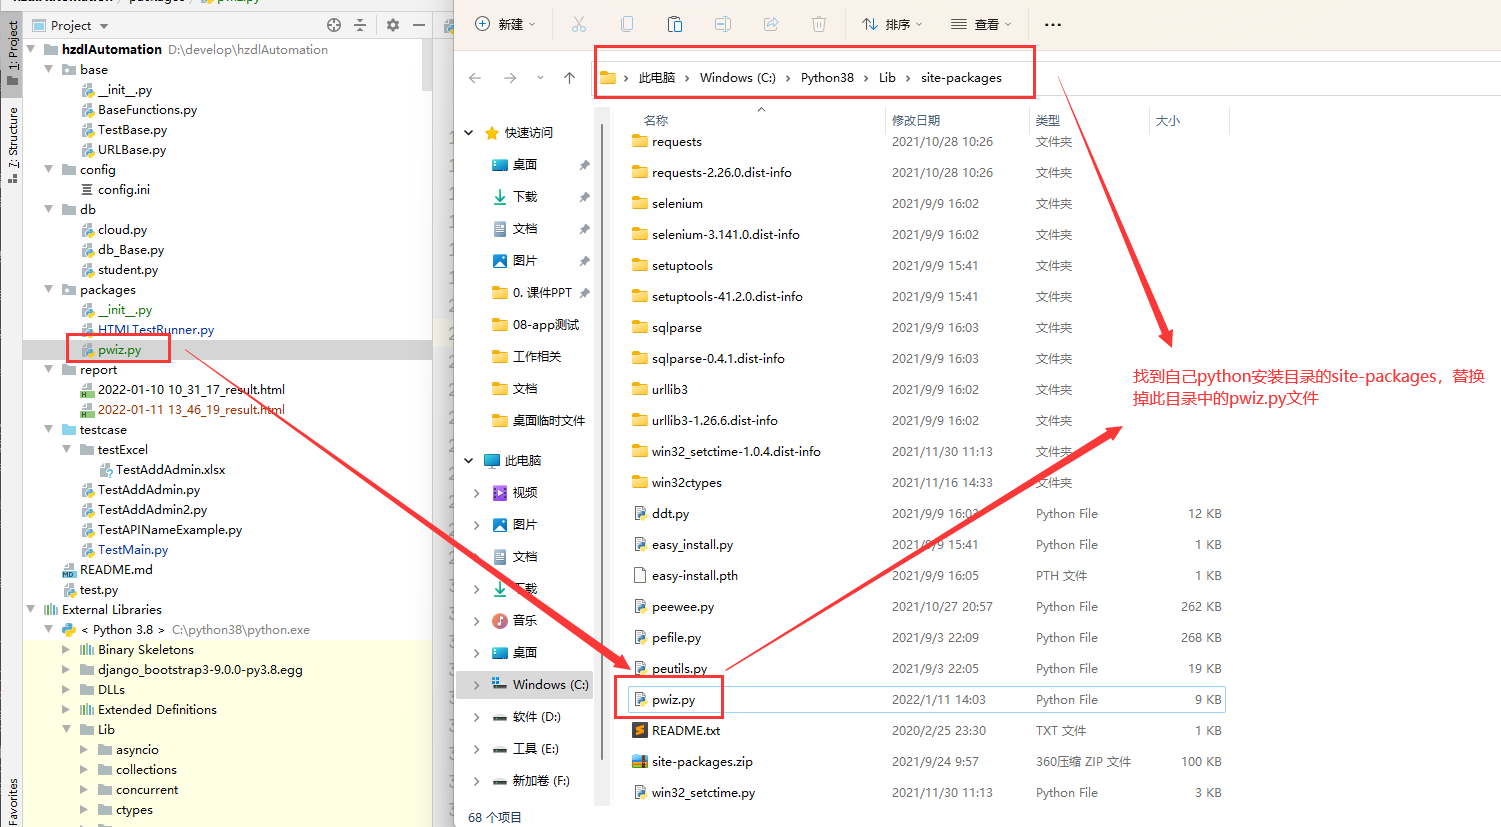
用项目中packages目录中的pwiz.py文件替换python环境中的pwiz.py文件, 自动生成的文件更改了适合自动化测试项目的模板,所以需要替换
逆向生成测试的数据库文件
请根据实际情况进行更改:
"python -m pwiz -e mysql -H 127.0.0.1 -p 3306 -u root -P 123456 test >./db/test.py"
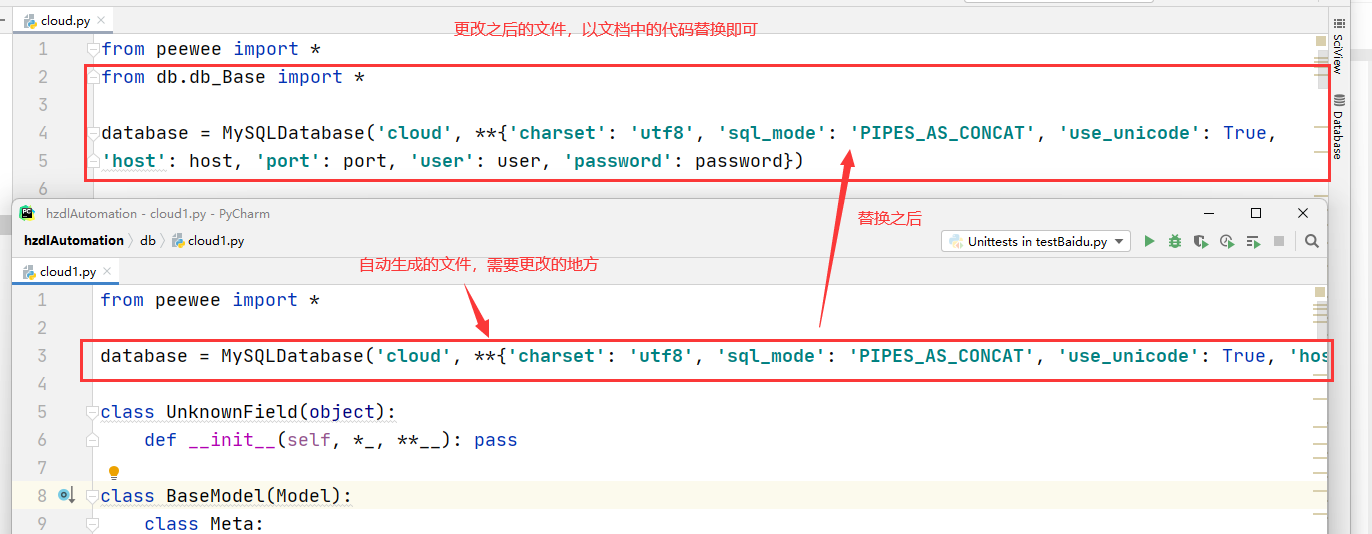
更改自动生成的model文件:
以下列代码替换原本生成的代码:
注意: MySQLDatabase方法的第一个入参例子中是cloud,需要替换成你生成的数据库名称,与数据库名称一致
from db.db_Base import *
database = MySQLDatabase('cloud', **{'charset': 'utf8', 'sql_mode': 'PIPES_AS_CONCAT', 'use_unicode': True,
'host': host, 'port': port, 'user': user, 'password': password})
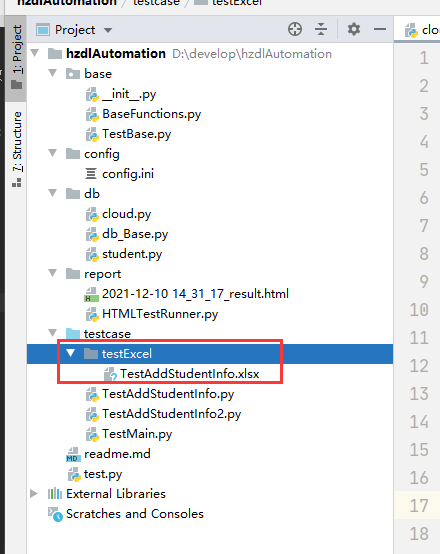
第四步: 编写测试用例数据文件
注意:
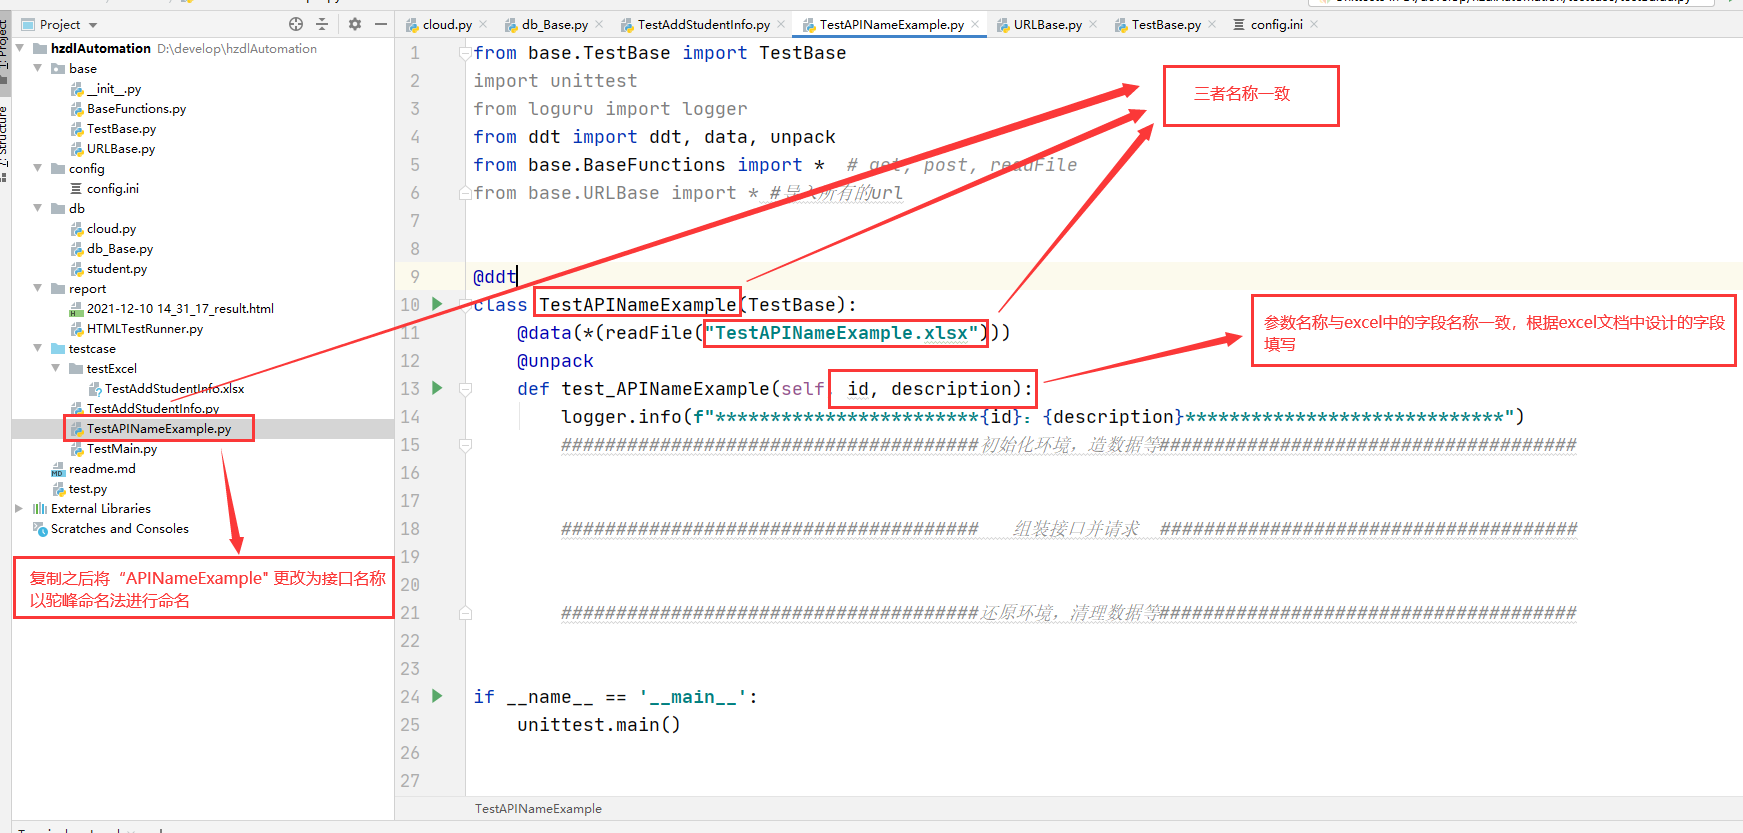
① 文件名称与测试文件(py文件)相同,以“Test+接口名称”.xlsx, 驼峰命名法
② 文件路径放到testCase/testExcel目录,如图
③ 文件内容中第一行为字段名称,且必须有id,以此区分用例
④ 文件内容中必须有description字段,用以描述此用例
⑤ 文件其他单元格中为空
⑥ 文件每一行为一条测试用例
第五步: 编写测试代码
复制TestAPINameExample文件,并更改相应的内容, 如图:
第六步: 编写测试方法的代码
① 初始化环境、造数据:
方法一: 在BaseFunction文件中编写数据库表格的增删改查方法,直接调用
方法二: 调用接口造数据: 比如登录接口
② 组装测试接口数据、调用测试接口得到response,并进行验证
验证: response和数据库
注意: 所有接口的URL都在URLBase中进行集中管理,如图:
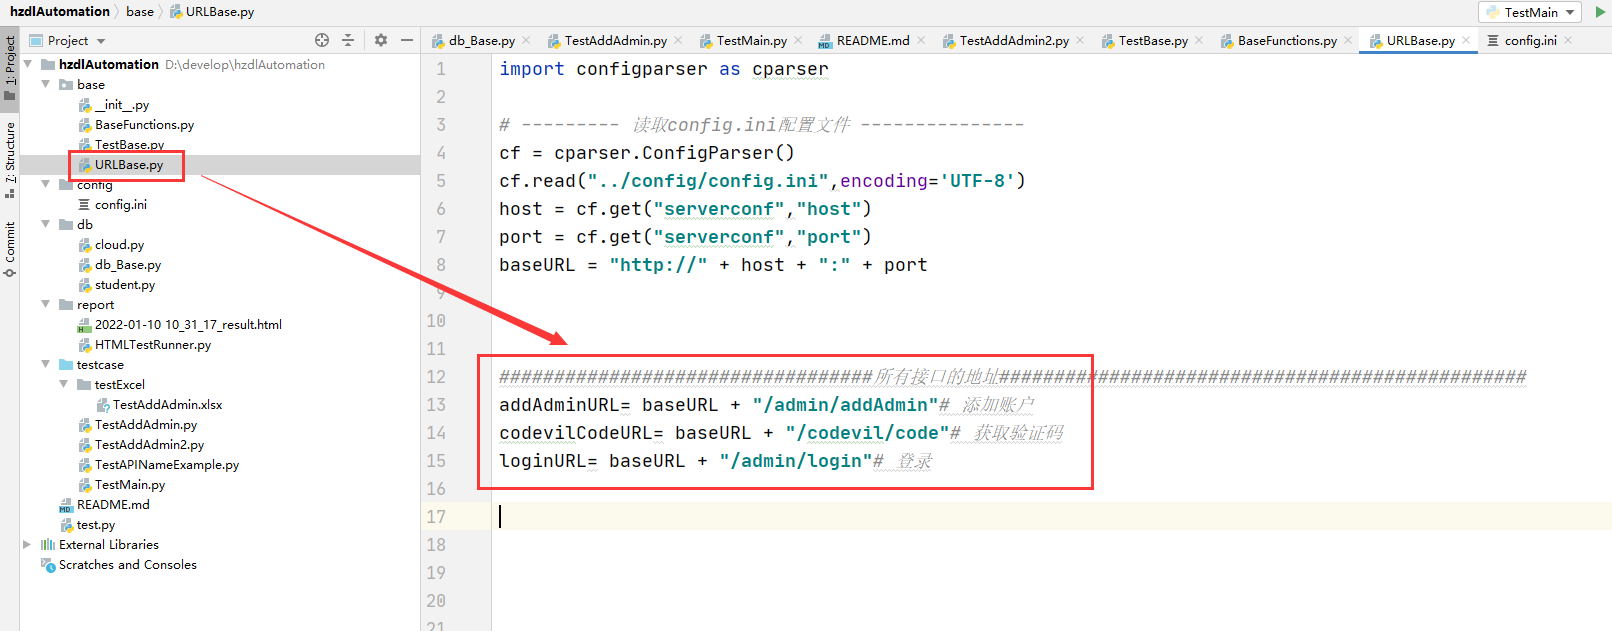
③ 还原环境,清理数据,与初始化环境类似
注意: 编写过程中,可以参照框架中已经完成的例子
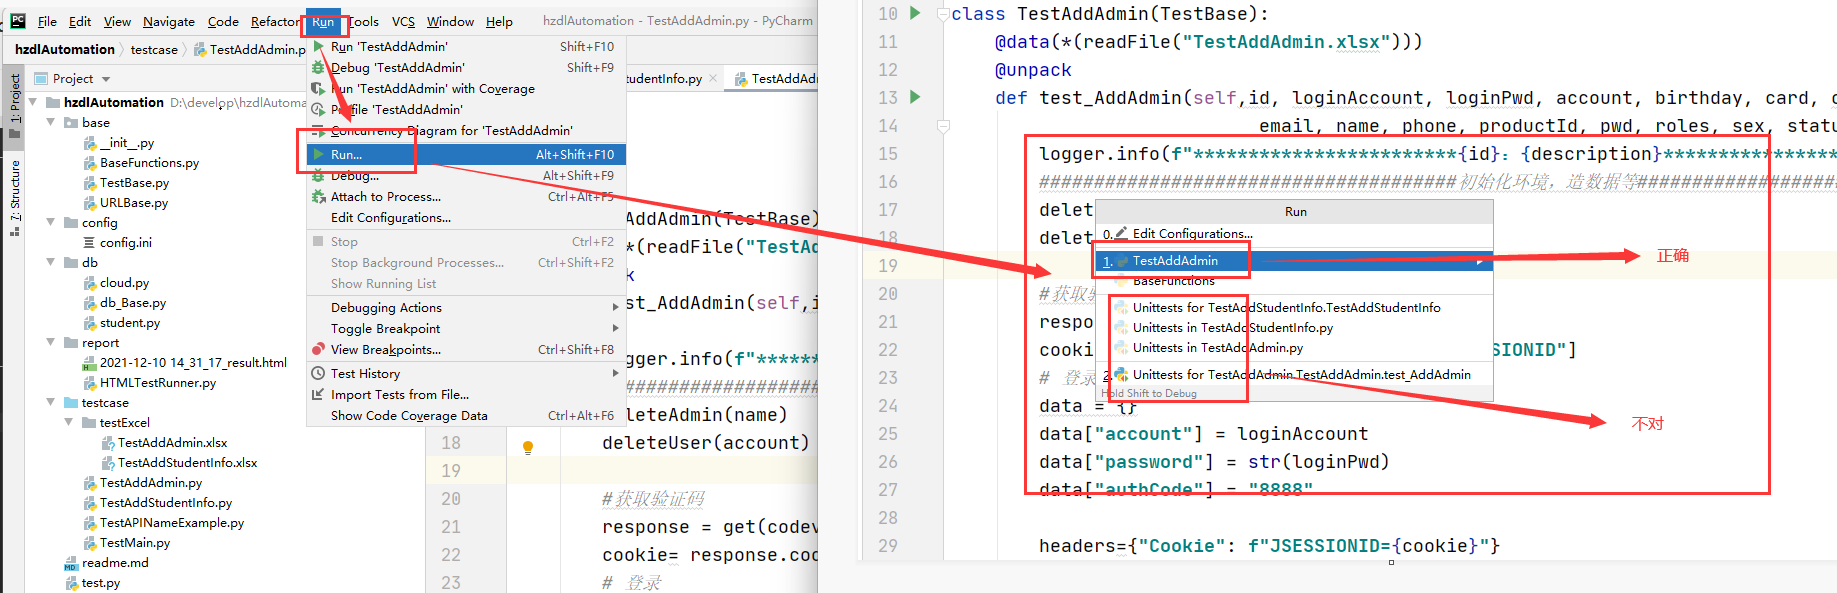
第七步: 运行测试用例
① 方法一:单个测试文件运行,直接在文件内部右键运行
注意: 不要运行 'run unittests in xxxx'选项,如果只有此选项,则按照图示进行操作
 ② 方法二:批量测试文件运行,直接运行testcase目录中的TestMain文件,会批量运行testcase目录中所有的测试文件并在report目录中生成测试报告

作者微信:有问题请联系!

此处可能存在不合适展示的内容,页面不予展示。您可通过相关编辑功能自查并修改。
如您确认内容无涉及 不当用语 / 纯广告导流 / 暴力 / 低俗色情 / 侵权 / 盗版 / 虚假 / 无价值内容或违法国家有关法律法规的内容,可点击提交进行申诉,我们将尽快为您处理。


